Monday 7th November
iZotope RX 5 Audio Advanced Editor Research
iZotope’s RX5 Advanced Audio Editor, screenshots taken myself.
Earlier in the week, David got in contact with us asking for help removing a prominent emergency services’ siren which was captured beneath a dialogue track. As I had little experience with RX, and this was one of my individual learning outcomes, I agreed to take on the task and have written a detailed report below illustrating iZotope’s RX 5 Audio Editor and my process with the task.
RX 5
As the name suggests, RX 5 is the fifth instalment of iZotope’s audio repair software which includes features such as: De-plosive, De-clip, De-noise and De-hum, as well as Ambience Match, EQ Match, Leveller and Spectral Repair, among many other useful processors. iZotope offer both a standard and advanced package, the latter being which our university purchased allowing me to experience using the full-feature version.
“RX 5 Advanced Audio editor is designed for professional post production audio engineers who demand best in class audio processing tools and deep controls” (iZotope.com, 2016).
Initial Research
I began the process by watching iZotope’s “RX 5 Quickstart” video on Youtube. This was helpful when explaining the basic tools such as time/frequency magnification and the six specialist tools which allow selections on the spectrogram in the time/frequency domain:
Time: Timeline selections
Time + Frequency: Rectangular selections across time and frequency
Frequency: Frequency selections
Lasso: Large free-form selections
Paintbrush: Freehand selections
Magic Wand: Select harmonic material
Instant Process: A faster way of using the tools on the sidebar. Processes include Attenuate, De-click, Fade, Gain and Replace. Recommended for speed use when user is comfortable, as after a selection is made automatic processes occur.
Additionally, the video illustrated how to open files in RX as well as how the file would be displayed. RX utilizes a spectrogram, which displays Time on the x-axis, Frequency on the y-axis and Amplitude as brightness. This is a particularly useful feature, as this brightness allows one to see actual sounds in the window and remove them, but more on that later. Please see below the Clip opened in RX. There is also an additional playback button, which allows the user to play back the highlighted selection, keyboard shortcuts explained in the video and a helpful Undo feature to minimize destructive processes.
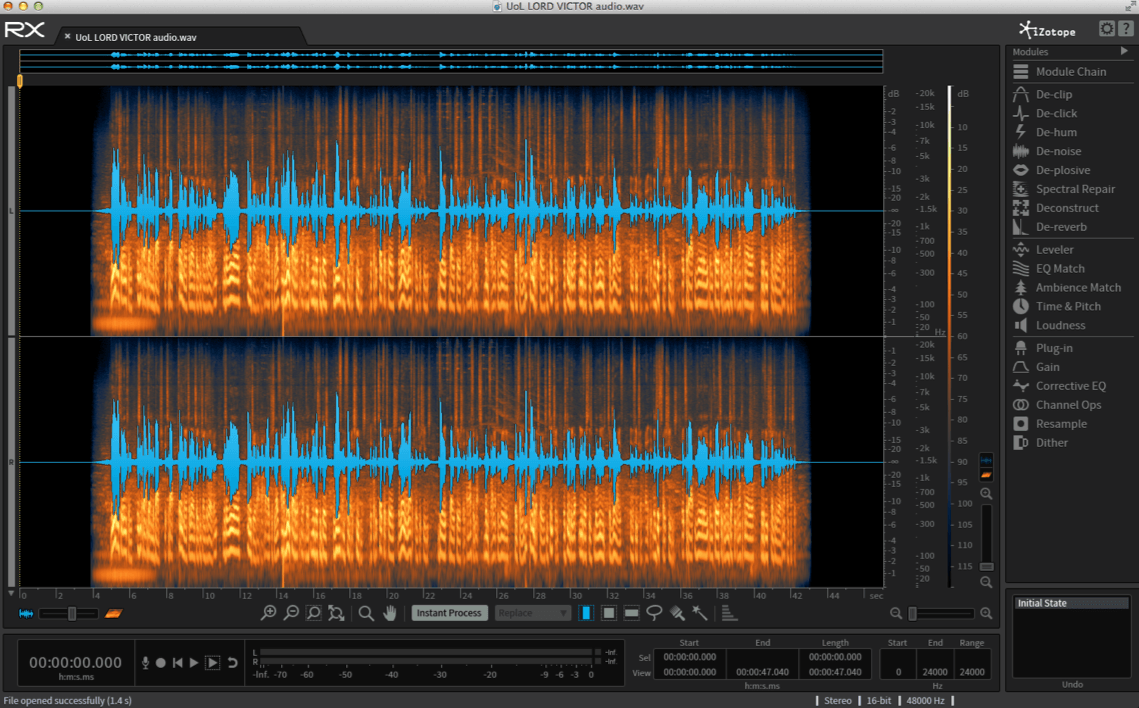
Dialogue track opened with RX.
Spectral Repair
One of the most interesting and useful tools RX contains is the Spectral Repair tool. As previously mentioned, the way that Amplitude is displayed through brightness allows the user to visually spot unwanted sounds and remove them using this tool. By selecting the unwanted noise or sound and using the Spectral Repair tool to Replace a sound, it removes the unwanted noise by using similar sounds around it. This seems like an incredibly valuable tool and one I wish to get better at using, in order to simply draw out unwanted sounds from an audio file.

Unwanted siren. The highs in the smaller box were easier to fix, the diagonal dashes across the frequency spectrum in the bigger box much more difficult to remove.
After this, I watched another iZotope YouTube video entitled, “Dialogue & Voiceover Track Editing in RX 5”, which took me through the basics of using the repair and removal tools, such as: De-clip, -click, -hum, -noise and –plosive. This explained what each tool was, what it would do, how to use it and tips when using the tools.
Process
Watching the tutorials made me want to get hands on with the file and start editing. First of all, I listened to the raw track to see how I could improve the clip. The initial issue I noticed was the difference in background, which changes three times throughout the clip. The first background seemed to change at 19 seconds, where it seems to diminish and the tone of the voice also changes. Just after this (around 22 seconds) the siren is heard for the first time until 30 seconds in. Then, at 36 seconds the background seems to change again, adding more noise to the track. I believe the sound team who captured the location audio may have used different types of mics, a lav being a certainty, and edited the raw audio together to create this track. There were also other issues, such as a clip around 14 seconds, a pop around 37 seconds and some boom handling noise. The aim was to clean up these issues, while allowing the background noise to breathe, giving the dialogue some context.
Whilst doing earlier research for this module, I read in Mark Scetta’s Gardner’s Guide to Audio Post Production (2007) an operation of best results when tackling dialogue restoration. The order, (cited from CEDAR Audio Limited, www.cedaraudio.com) suggested:
- De-click and de-pop
- De-crackle
- De-hum and de-buzz
- De-hiss
Using this model, I first applied De-click to the track which subtly improved clicks made by the speaker’s mouth. De-crackle did a similar job but also reduced pop noises. At this stage, I also applied De-plosive, to reduce the Bs and Ps that were captured from the speaker.
For De-noise, I split the track into the three backgrounds as the background noise produced was all different. First, I allowed the tool to ‘Learn’ and therefore treat the background noise to help remove it. Initially, the tool had taken too much of the background noise out – which would be good in most circumstances – but when chatting to David, he said leave some in to give the speaker some context, to match the video as the location sound team may not have captured background noise to layer underneath.
After altering the initial settings, I found a nice balance which luckily sounded similar to the background noise of the clip from 19-36 seconds, making the background sound smoother and more constant. The final part of the clip was very difficult to fix, as the noise/hiss was very apparent and loud in when captured.
After this, I attempted using Spectral Repair to remove the sounds of the siren. However, the unwanted sound masks nearly the entirety of the frequency spectrum. Therefore, trying to remove these frequencies vastly altered the frequency and tone of the speaker’s dialogue, rendering it unusable. I tried other settings such as EQ and Ambience match, as well as the time & pitch tool to minimize background noise, but it appeared as though the siren was not recognized as background noise because it was so prominent in the frequency spectrum.
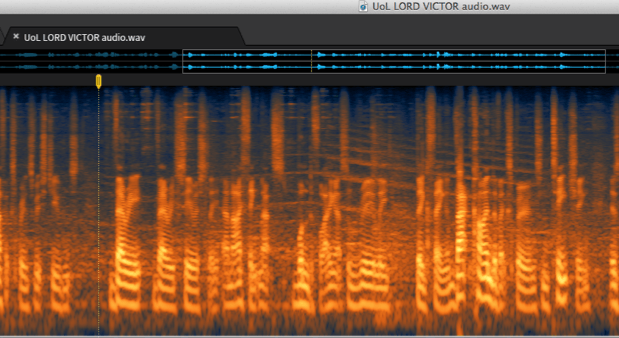
Spectrogram of the unwanted siren sound without wave. Clearer representation of how spread out the frequencies of this noise were, making it very difficult to remove without affecting the speaker’s voice.
However, I did my best to clean up the rest of the dialogue, used the Leveller to balance the signal level to a good standard (around -23dB) and sent the clip back to David. Electric Egg and the client were happy with the improvement I had made, even if I wasn’t happy myself.
Conclusion
To conclude, I believe that I have learnt a lot during this experience, especially as I am now introduced to RX’s basic tools and processors. I have also learnt that some sounds do have the ability to be removed from a track (sounds with narrow frequency. See the “Quickstart” video in the references), however, other sounds, such as a siren which covers the entire frequency are much harder to deal with. If this ever occurs on a location dialogue track I would definitely suggest re-recording the dialogue after the siren has passed, instead of “fixing it in post”. Moreover, I thought this was a particular difficult clip to edit, as it appeared to already have been edited. This was illustrated by the difference in background noise, tone of the speaker’s voice and volume level which differed throughout. However, I am now working on a shot 5-minute documentary which includes a lot of narrative. I am transferring my RX skills over to this to improve the audio quality (of which I captured myself on location) for the doc. I will also be writing a post on this to see how my skills have developed in the area of dialogue editing.
References:
iZotope, Inc. (2015) Dialogue & Voiceover Track Editing [online video] Available from https://www.youtube.com/watch?v=RKXgAZtx10I&index=3&list=PL4dISychPQEsxHEurjxnooOEoR5I1D-O9 [Accessed 7 November 2016].
iZotope, Inc. (2015) How to Remove Unwanted Sounds [online video] Available from https://www.youtube.com/watch?v=apjW0xx5gnk [Accessed 7 November 2016].
iZotope, Inc. (2015) RX 5 Quickstart [online video] Available from https://www.youtube.com/watch?v=yiKxyNgmxac&list=PL4dISychPQEsxHEurjxnooOEoR5I1D-O9&index=2 [Accessed 7 November 2016].
Robjohns, H. (2016) iZotope RX5 [online] Cambridge: Sound On Sound Ltd. Available from http://www.soundonsound.com/reviews/izotope-rx5 [Accessed 7 November 2016].
Scetta, M. (2008) Gardner’s Guide to Audio Post Production. London: GGC Publishing.
Published by