Reference List


This is my reference list utilised throughout semester A:


Ament, V. T. (2014) The Foley Grail: The Art of Performing Sound for Film, Games and Animation. [2nd edition] USA: Focal Press.


BBC. Genome BETA Radio Times 1923-2009. [online] BBC: London. Available from http://genome.ch.bbc.co.uk/schedules/radio1/england/1979-07-19 [Accessed 23 September 2016].


Butters, J. (2007) Transistor Radios. [online] Available from http://www.jamesbutters.com/perdiopr33mini66.htm [Accessed 23 September 2016].


Davies, A. (1999) Radio Rewind. [online] Available from http://www.radiorewind.co.uk [Accessed 23 September 2016].


Fincher, D. (dir.) (1999) Fight Club. [film] London: 20th Century Fox.


Fincher, D. (dir.) (2007) Zodiac. [film] London: Warner Bros.


Holman, T. (2005) Sound for Digital Video. Oxford: Focal Press.


iZotope (2012) Insight Overview. [online] Available from https://www.youtube.com/watch?v=vCSjR9XVC8M. [Accessed 13 Dec 2016].


iZotope (2014) Loudness Compliant Metering. [online] Available from https://www.youtube.com/watch?v=3HDjsLR6YhY&t=99s. [Accessed 13 Dec 2016].


iZotope (2015) Ambience / Room Tone Matching with RX 5 Advanced Audio Editor & Pro Tools. [online] Available from https://www.youtube.com/watch?v=qK-sahpnvG8&index=8&list=PL4dISychPQEsxHEurjxnooOEoR5I1D-O9 [Accessed 23 November 2016].


iZotope (2015) How to Match Audio from Different Sound Sources. [online] Available from https://www.youtube.com/watch?v=0Um7qkHd-2w [Accessed 23 November 2016].


iZotope (2015) RX Post Production Suite: Using RX Post Production Plug-ins & Pro Tools – Part 1. [online] Available from https://www.youtube.com/watch?v=ulgA6NMEPZw&index=6&list=PL4dISychPQEsxHEurjxnooOEoR5I1D-O9 [Accessed 23 November 2016].


iZotope, Inc. (2015) Dialogue & Voiceover Track Editing [online video] Available from https://www.youtube.com/watch?v=RKXgAZtx10I&index=3&list=PL4dISychPQEsxHEurjxnooOEoR5I1D-O9 [Accessed 7 November 2016].


iZotope, Inc. (2015) How to Remove Unwanted Sounds [online video] Available from https://www.youtube.com/watch?v=apjW0xx5gnk [Accessed 7 November 2016].


iZotope, Inc. (2015) RX 5 Quickstart [online video] Available from https://www.youtube.com/watch?v=yiKxyNgmxac&list=PL4dISychPQEsxHEurjxnooOEoR5I1D-O9&index=2 [Accessed 7 November 2016].


Robjohns, H. (2016) iZotope RX5 [online] Cambridge: Sound On Sound Ltd. Available from http://www.soundonsound.com/reviews/izotope-rx5 [Accessed 7 November 2016].


Scetta, M. (2008) Gardner’s Guide to Audio Post Production. London: GGC Publishing.


TBSmedia (2015) Zodiac Analysis – Inside the Basement. [online] Availabe from https://www.youtube.com/watch?v=Af78yVw_O9c. [Accessed 13 Dec 2016].


Unknown (2012) Video and Audio Solutions for Broadcast: What is R128? [online] Available from http://www.r128audio.com. [Accessed 13 Dec 2016].

Unknown (2015) Broadcast Standards. [online] Available from http://www.tcelectronic.com/loudness/broadcast-standards/. [Accessed 13 Dec 2016].


Viers, R. (2012) The Location Sound Bible. California: Michael Wiese Productions.


Vintage Radios. A Brief History of the Transistor Radio. [online] Available from http://www.vintageradios.com/a-brief-history-of-the-transistor-radio/ [Accessed 23 September 2016].


Wyatt, H. and Amyes, T. (2005) Audio Post Production for Television and Film: An introduction to technology and techniques. [3rd edition] Oxford: Focal Press.


YouTube. (2012) RetroRadioUK. [online] Available from https://www.youtube.com/user/RetroRadioUK/about [Accessed 23 September 2016].
 

Location Sound Prep 2


Wednesday 9th November 

Set Etiquette Research 

Again, as the shoot is nearing I honed up my skills on set etiquette, as this is included within my location sound learning outcomes. I set out to achieve extra information on how to behave on set and work with a film crew.

I learned many things while reading this resource. Mainly, it has highlighted to me that while sound is as equal to picture, you will never be treated that way. All of the focus is on camera, e.g. out of 40 crew members only 2/3 are dedicated to sound – the rest the picture. Viers illustrates the importance of having a good attitude and not being a “know-it-all mixer”, as well as being punctual, prepared, a team player, being safe (incredibly important), being dressed appropriately, and working with others. That is, understand that directors, DPs and actors are all likely to have some sort of ego, it’s the role they are in. It’s their vision so they are important, supposedly. This means personal skills, the ability to bite your lip, get on with it, get paid and move on is extra important.
This has addressed great skills to acquire, but so far working with the film crew, there has been no issue with egos, communication or not being prepared or willing to work in the team, which is a healthy positive.

I have also learned to know my place onset. Unfortunately Sound Mixers and Boom Ops are treated as secondary, and the director has the final say. Directors, DPs, lighting crew, etc. are not worried about the job I will be doing, but trusting that it has been done correctly. “Understand that nobody compliments the sound in a production when it is good. They only complain about the sound when it is bad. Get used to it. It’s a thankless job”. Personal skills are also very important. Being easy to get on with, good with communication and being willing to be a team player are as, if not more, important than being an “audio-genius”. Viers suggests a know-it-all with a bad, strict attitude will not be hired compared to someone who knows less, but is easy to get on with, friendly, knows their place and their role and gets on with the job.

Aims

In conclusion, I am aiming to use and improve these skills on set. To know my place and while offer my opinion to the director, understand it is their vision and they have the final say. I will be willing to help wherever I can as part of the team, and I will be prepared to expect the unexpected, and be adaptive to any changes or challenges we may face. I will assess my set etiquette and behaviour onset after the shoot via a feedback form filled in by the crew.


Reference List

Viers, R. (2012) The Location Sound Bible. California: Michael Wiese Productions.

Practical RX Research 2


Friday 4th – Sunday 6th November 

Kinema Documentary Post Production – RX Research 2

This blog posts concerns Part 2 of The Kinema in the Woods Documentary Process, produced by MA student Ed Kirk.

When reading that post, you would have discovered that the outside atmos and wild tracks were unusable on location due to the heavy air traffic overhead. I utilized the university’s SFX Library, finding layers of bird call, tree rustles, light wind and evening wind which was used for the opening shots of the Kinema. It was fairly easy to find good clips due to the vast resource that the SFX Library is. Once I had found these sounds, I could open the OMF and start editing as I had all the tracks I would need. I opened the OMF, organized the session into dialogue + speakers, atmos, music, SFX, etc, and colour coded the session for ease of use.

Unfortunately, I had to spend a lot of time re-syncing the audio, as when I recorded on location I used the Polywav setting. This means that in one single file, there is actually all the input files stored. For example, one file would contain the Stereo Left and Stereo Right Mix, as well as the additional 3 XLR inputs used, in my case just the two – Boom and Radio Mic 1. However, when editing on Premiere, Ed only used the Stereo L and Rs, meaning that the isolated Boom and Radio Mic tracks were not utilized. Syncing these isolated tracks did consume quite a lot of time, but it was a worthwhile practice as I needed to have the choice between the two, which were of higher quality. After the dialogue was synced, the opening atmos and wild tracks were added, and the music was synced (already done by Ed) and I began to edit the clips.

First of all, I went through the dialogue rushes each speaker, listening to which mic sounded better for each clip. I used the boom for the majority of Phil and Alan’s dialogue, but surprisingly used the radio mics for Jo, as they minimalized background noise – at one point, there was an aeroplane heard in the boom track quite loudly, but not as much so on the radio mic.

After listening to these rushes, I made a note of when I got hear obscurities in the tracks; pops, boom handling, background noise, etc. and got to work fixing them with RX. I used the skills I learned for the previous blog post about RX – fixing the UoL dialogue track with the siren on it, for the most part, but also gained some new skills.

RX Practical Research

There were a couple of times on Phil’s dialogue track where boom handling could be heard. In order to rectify this, I needed to take the same part from the radio mic and blend it in smoothly to replace the noise. This required watching iZotope’s video on Ambience and Room Tone matching and How to Match Audio from Different Sound Sources. The first video was very helpful when showing the basics of RX’s Ambience and EQ Match – how they ‘learn’ the Ambience and EQ and can be applied to another track. However, it was the second video which was much more useful, as it was directly relevant to what I was working on. The creator of the video was explaining how to match the Ambience and EQ of the dialogue when switching from Voiceovers to field Radio Mics for a documentary – similar to what I was doing: Boom to Radio Mic. The creator describes this process as a “constant headache”. Before using RX for Ambience and EQ Match, I first watched iZotope’s video on Using RX Post Production Plug-ins & Pro Tools – Part 1. This taught me how to correctly route the RX plug-in onto a channel in order for it to be heard in the session.

Ambience & EQ Match in RX

I needed to replace a small section of Boom track, as handling noise was audible and could not be removed with other processes. Therefore, this guide shows how I matched the EQ and Ambience from the Boom track and processed it onto the Radio Mic track, to make this blend into the Boom and sound realistic and unnoticeable.

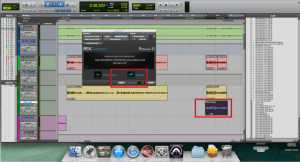
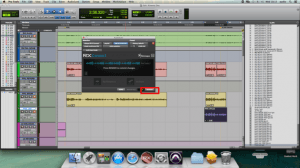
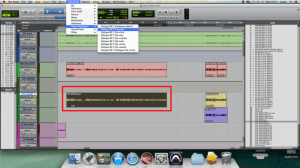
1) I selected a section of Boom track that is being used, as this is what the reference is. I then selected AudioSuite > Noise Reduction > RX Connect to bring the Connect window up.

Picture1

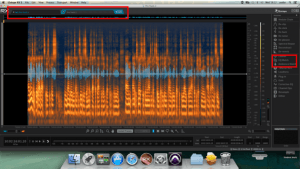
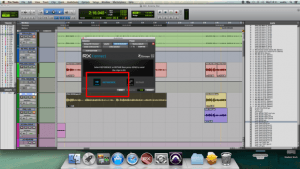
2) I then clicked REFERENCE, as this is the Ambience and EQ which is favourable, then SEND,                                                                                                     which send this track to the RX Audio Editor.

Picture2

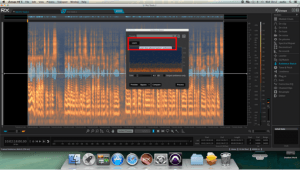
3) After this, I selected the Radio Mic track which was to be processed, then selected REPAIR and SEND, which brings up the RX Editor.

Picture3

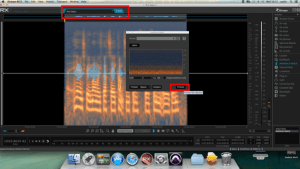
4) As you can see below there is both the Reference track and track to be repaired displayed in separate tabs. By highlighting the Reference track and selecting either Ambience or EQ Match, then LEARN, the Editor will learn the Ambience/EQ of the Reference Track.

Picture4

Picture5

5) Then, by highlighting the track to be repaired, selecting the Ambience/EQ Match window, and clicking PROCESS, the reference will be applied to the desired track.

Picture6

6) After this, I clicked SEND BACK (which sends the clip back to Pro Tools) and RENDER, which destructively alters the clip.

Picture7

I found this a very useful and enlightening practice, as I had no previous experience of working with these processes. I believe they will help me greatly when working on the audio for Cognition, as there was lots of traffic noise which was captured that needs to be addressed.

Final Product

I handed Ed the complete file, but he had been working on Documentary himself and only required a dialogue mix. Therefore, I exported one of these and he uploaded the video days later. This means for the final video my work included the Location Sound and Dialogue Edit, NOT the atmos/SFX at the beginning of the clip, OR any of the music, which Ed also altered himself. I have embedded the video below for you to listen to my dialogue edit. It is not perfect, but it was the best I could do in the time that I had. I believe that I have learned many skills over these sessions using RX, and have gained confidence in my ability to repair and improve damaged clips. I will take this research into the post production of Cognition, to continue learning and improving when editing and cleaning Dialogue for both documentaries and dramas.

References

iZotope (2015) RX Post Production Suite: Using RX Post Production Plug-ins & Pro Tools – Part 1. [online] Available from https://www.youtube.com/watch?v=ulgA6NMEPZw&index=6&list=PL4dISychPQEsxHEurjxnooOEoR5I1D-O9 [Accessed 23 November 2016].

iZotope (2015) Ambience / Room Tone Matching with RX 5 Advanced Audio Editor & Pro Tools. [online] Available from https://www.youtube.com/watch?v=qK-sahpnvG8&index=8&list=PL4dISychPQEsxHEurjxnooOEoR5I1D-O9 [Accessed 23 November 2016].

iZotope (2015) How to Match Audio from Different Sound Sources. [online] Available from https://www.youtube.com/watch?v=0Um7qkHd-2w [Accessed 23 November 2016].

Practical Research


Monday 7th November 

iZotope RX 5 Audio Advanced Editor Research

Open Screen CROP
iZotope’s RX5 Advanced Audio Editor, screenshots taken myself. 

Earlier in the week, David got in contact with us asking for help removing a prominent emergency services’ siren which was captured beneath a dialogue track. As I had little experience with RX, and this was one of my individual learning outcomes, I agreed to take on the task and have written a detailed report below illustrating iZotope’s RX 5 Audio Editor and my process with the task.

RX 5

As the name suggests, RX 5 is the fifth instalment of iZotope’s audio repair software which includes features such as: De-plosive, De-clip, De-noise and De-hum, as well as Ambience Match, EQ Match, Leveller and Spectral Repair, among many other useful processors. iZotope offer both a standard and advanced package, the latter being which our university purchased allowing me to experience using the full-feature version.

“RX 5 Advanced Audio editor is designed for professional post production audio engineers who demand best in class audio processing tools and deep controls” (iZotope.com, 2016).

Initial Research

I began the process by watching iZotope’s “RX 5 Quickstart” video on Youtube. This was helpful when explaining the basic tools such as time/frequency magnification and the six specialist tools which allow selections on the spectrogram in the time/frequency domain:

Time: Timeline selections
Time + Frequency: Rectangular selections across time and frequency
Frequency: Frequency selections
Lasso: Large free-form selections
Paintbrush: Freehand selections
Magic Wand: Select harmonic material

Instant Process: A faster way of using the tools on the sidebar. Processes include Attenuate, De-click, Fade, Gain and Replace. Recommended for speed use when user is comfortable, as after a selection is made automatic processes occur.

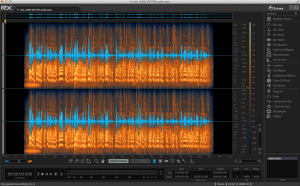
Additionally, the video illustrated how to open files in RX as well as how the file would be displayed. RX utilizes a spectrogram, which displays Time on the x-axis, Frequency on the y-axis and Amplitude as brightness. This is a particularly useful feature, as this brightness allows one to see actual sounds in the window and remove them, but more on that later. Please see below the Clip opened in RX. There is also an additional playback button, which allows the user to play back the highlighted selection, keyboard shortcuts explained in the video and a helpful Undo feature to minimize destructive processes.

Open File CROP
Dialogue track opened with RX.

Spectral Repair

One of the most interesting and useful tools RX contains is the Spectral Repair tool. As previously mentioned, the way that Amplitude is displayed through brightness allows the user to visually spot unwanted sounds and remove them using this tool. By selecting the unwanted noise or sound and using the Spectral Repair tool to Replace a sound, it removes the unwanted noise by using similar sounds around it. This seems like an incredibly valuable tool and one I wish to get better at using, in order to simply draw out unwanted sounds from an audio file.

SR Siren CROP
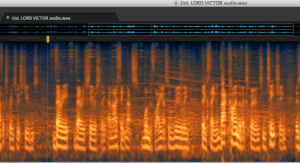
Unwanted siren. The highs in the smaller box were easier to fix, the diagonal dashes across the frequency spectrum in the bigger box much more difficult to remove. 

After this, I watched another iZotope YouTube video entitled, “Dialogue & Voiceover Track Editing in RX 5”, which took me through the basics of using the repair and removal tools, such as: De-clip, -click, -hum, -noise and –plosive. This explained what each tool was, what it would do, how to use it and tips when using the tools.

Process

Watching the tutorials made me want to get hands on with the file and start editing. First of all, I listened to the raw track to see how I could improve the clip. The initial issue I noticed was the difference in background, which changes three times throughout the clip. The first background seemed to change at 19 seconds, where it seems to diminish and the tone of the voice also changes. Just after this (around 22 seconds) the siren is heard for the first time until 30 seconds in. Then, at 36 seconds the background seems to change again, adding more noise to the track. I believe the sound team who captured the location audio may have used different types of mics, a lav being a certainty, and edited the raw audio together to create this track. There were also other issues, such as a clip around 14 seconds, a pop around 37 seconds and some boom handling noise. The aim was to clean up these issues, while allowing the background noise to breathe, giving the dialogue some context.

Whilst doing earlier research for this module, I read in Mark Scetta’s Gardner’s Guide to Audio Post Production (2007) an operation of best results when tackling dialogue restoration. The order, (cited from CEDAR Audio Limited, www.cedaraudio.com) suggested:

  1. De-click and de-pop
  2. De-crackle
  3. De-hum and de-buzz
  4. De-hiss

Using this model, I first applied De-click to the track which subtly improved clicks made by the speaker’s mouth. De-crackle did a similar job but also reduced pop noises. At this stage, I also applied De-plosive, to reduce the Bs and Ps that were captured from the speaker.

For De-noise, I split the track into the three backgrounds as the background noise produced was all different. First, I allowed the tool to ‘Learn’ and therefore treat the background noise to help remove it. Initially, the tool had taken too much of the background noise out – which would be good in most circumstances – but when chatting to David, he said leave some in to give the speaker some context, to match the video as the location sound team may not have captured background noise to layer underneath.

After altering the initial settings, I found a nice balance which luckily sounded similar to the background noise of the clip from 19-36 seconds, making the background sound smoother and more constant. The final part of the clip was very difficult to fix, as the noise/hiss was very apparent and loud in when captured.

After this, I attempted using Spectral Repair to remove the sounds of the siren. However, the unwanted sound masks nearly the entirety of the frequency spectrum. Therefore, trying to remove these frequencies vastly altered the frequency and tone of the speaker’s dialogue, rendering it unusable. I tried other settings such as EQ and Ambience match, as well as the time & pitch tool to minimize background noise, but it appeared as though the siren was not recognized as background noise because it was so prominent in the frequency spectrum.

No wave 2
Spectrogram of the unwanted siren sound without wave. Clearer representation of how spread out the frequencies of this noise were, making it very difficult to remove without affecting the speaker’s voice. 

However, I did my best to clean up the rest of the dialogue, used the Leveller to balance the signal level to a good standard (around -23dB) and sent the clip back to David. Electric Egg and the client were happy with the improvement I had made, even if I wasn’t happy myself.

Conclusion

To conclude, I believe that I have learnt a lot during this experience, especially as I am now introduced to RX’s basic tools and processors. I have also learnt that some sounds do have the ability to be removed from a track (sounds with narrow frequency. See the “Quickstart” video in the references), however, other sounds, such as a siren which covers the entire frequency are much harder to deal with. If this ever occurs on a location dialogue track I would definitely suggest re-recording the dialogue after the siren has passed, instead of “fixing it in post”. Moreover, I thought this was a particular difficult clip to edit, as it appeared to already have been edited. This was illustrated by the difference in background noise, tone of the speaker’s voice and volume level which differed throughout. However, I am now working on a shot 5-minute documentary which includes a lot of narrative. I am transferring my RX skills over to this to improve the audio quality (of which I captured myself on location) for the doc. I will also be writing a post on this to see how my skills have developed in the area of dialogue editing.

References:

iZotope, Inc. (2015) Dialogue & Voiceover Track Editing [online video] Available from https://www.youtube.com/watch?v=RKXgAZtx10I&index=3&list=PL4dISychPQEsxHEurjxnooOEoR5I1D-O9 [Accessed 7 November 2016].

iZotope, Inc. (2015) How to Remove Unwanted Sounds [online video] Available from https://www.youtube.com/watch?v=apjW0xx5gnk [Accessed 7 November 2016].

iZotope, Inc. (2015) RX 5 Quickstart [online video] Available from https://www.youtube.com/watch?v=yiKxyNgmxac&list=PL4dISychPQEsxHEurjxnooOEoR5I1D-O9&index=2 [Accessed 7 November 2016].

Robjohns, H. (2016) iZotope RX5 [online] Cambridge: Sound On Sound Ltd. Available from http://www.soundonsound.com/reviews/izotope-rx5 [Accessed 7 November 2016].

Scetta, M. (2008) Gardner’s Guide to Audio Post Production. London: GGC Publishing.

Location Sound Preparation


– Monday 7th November 

Booming and Plant Mic Techniques

In order to prepare myself for the location shoot in a week’s time, I have been reading Ric Viers’ The Location Sound Bible (2012). There are many chapters I still need to read to develop my skill set, but I focused on booming and plant mic techniques to focus on improving my learning outcomes.

Boom Techniques

When conducting this research, my aims were to gain more knowledge into how to be a more professional Boom Operator, improving boom movement and position skills.

Boom Movements

Viers illustrates five types of boom pole movement, and six booming positions. Pole movement includes:

  • Cue: The rotation of the end of the boom, perhaps to used when single booming two interviewees facing each other
  • Swing: Keeping the back end of the pole still while the mic end moves in a circular motion left to right
  • Raise/lower: Self-explanatory, lifting or lowering the pole parallel to the ground
  • Pivot: The back end of the pole is held still while the hand in the middle of the pole (at the “fulcrum point”) moves up or down
  • Follow: The boom op shadows the actor with the boom pole

Booming Positions

The most common booming position is the “Standard ‘H’/field goal” position. The boom op holds the pole horizontal to the ground, above their head with the arms bent at the elbows. Other positions include the “Flagpole/lazy ‘H’”, which is similar to the H position, but the boom ops arms are by their side while their elbows are bent. The “Crucifix” position is held behind the neck with the arms outstretched, much like a crucifix. There is also the “One-handed” position, allowing the boom op to alter levels on the field recorder simultaneously, the “Joust” position which is the same as the one-handed just reverted into a scoop position. And finally the “Head” position which looks incredibly difficult to pull off, as the boom is resting on the head while one hand holds one end, and the other can mix levels on the field recorder.
I imagine we will use the Flagpole/Lazy H technique most as the location is very small and tight, with a fairly low ceiling (like any household) which may not allow us to boom as effectively overhead.

Plant Mic Techniques

When onset, we are aiming to use as plant mics as much as we can. This will hopefully improve our audio by picking up any lines unavailable to use for boom (so as reference), but also capture any natural reverb of the room, which can either be used for wild track or layered underneath to add natural reverb instead of artificial, in-the-box reverb. Viers suggests that lav mics are most commonly used for planting. They are small so are easy to conceal while directional lavs can capture great sounding audio. Furthermore, Viers illustrates creative places to situate plant mics, such as on/underneath tables, on flat surfces, desktops, plant pots or even fruit bowls. Hopefully we can muster-up this creativity onset and put lavs and boundary mics in interesting, creative places to capture the best sounding audio, i.e. Closest to the actors for dialogue. Viers outlines many creative places to plant mic a car interior which is very useful to know, and highlights to me the importance of thinking outside the box and being experimental whenever the time comes.

Conclusion

To conclude, Viers has given great insight into boom movement and techniques that I will definitely try out on set, my only worry is the small space we will be shooting in, which could mean using the “Lazy ‘H’” quite often, with a retracted pole. The location could also mean a lot of scooping and less need for extended boom pole positions and techniques, I can’t see the need for the “Crucifix” position in a spare bedroom. Additionally, after reading Viers’ chapter on plant mics, I get the impressions that creativity is key. Wherever we can be imaginative onset to hide mics will be great and I am very much looking forward to experimenting with the lavs and boundaries we shall be using, the aim is to use them as frequently as possible!


Reference List

Viers, R. (2012) The Location Sound Bible. California: Michael Wiese Productions.