Friday 4th – Sunday 6th November
Kinema Documentary Post Production – RX Research 2
This blog posts concerns Part 2 of The Kinema in the Woods Documentary Process, produced by MA student Ed Kirk.
When reading that post, you would have discovered that the outside atmos and wild tracks were unusable on location due to the heavy air traffic overhead. I utilized the university’s SFX Library, finding layers of bird call, tree rustles, light wind and evening wind which was used for the opening shots of the Kinema. It was fairly easy to find good clips due to the vast resource that the SFX Library is. Once I had found these sounds, I could open the OMF and start editing as I had all the tracks I would need. I opened the OMF, organized the session into dialogue + speakers, atmos, music, SFX, etc, and colour coded the session for ease of use.
Unfortunately, I had to spend a lot of time re-syncing the audio, as when I recorded on location I used the Polywav setting. This means that in one single file, there is actually all the input files stored. For example, one file would contain the Stereo Left and Stereo Right Mix, as well as the additional 3 XLR inputs used, in my case just the two – Boom and Radio Mic 1. However, when editing on Premiere, Ed only used the Stereo L and Rs, meaning that the isolated Boom and Radio Mic tracks were not utilized. Syncing these isolated tracks did consume quite a lot of time, but it was a worthwhile practice as I needed to have the choice between the two, which were of higher quality. After the dialogue was synced, the opening atmos and wild tracks were added, and the music was synced (already done by Ed) and I began to edit the clips.
First of all, I went through the dialogue rushes each speaker, listening to which mic sounded better for each clip. I used the boom for the majority of Phil and Alan’s dialogue, but surprisingly used the radio mics for Jo, as they minimalized background noise – at one point, there was an aeroplane heard in the boom track quite loudly, but not as much so on the radio mic.
After listening to these rushes, I made a note of when I got hear obscurities in the tracks; pops, boom handling, background noise, etc. and got to work fixing them with RX. I used the skills I learned for the previous blog post about RX – fixing the UoL dialogue track with the siren on it, for the most part, but also gained some new skills.
RX Practical Research
There were a couple of times on Phil’s dialogue track where boom handling could be heard. In order to rectify this, I needed to take the same part from the radio mic and blend it in smoothly to replace the noise. This required watching iZotope’s video on Ambience and Room Tone matching and How to Match Audio from Different Sound Sources. The first video was very helpful when showing the basics of RX’s Ambience and EQ Match – how they ‘learn’ the Ambience and EQ and can be applied to another track. However, it was the second video which was much more useful, as it was directly relevant to what I was working on. The creator of the video was explaining how to match the Ambience and EQ of the dialogue when switching from Voiceovers to field Radio Mics for a documentary – similar to what I was doing: Boom to Radio Mic. The creator describes this process as a “constant headache”. Before using RX for Ambience and EQ Match, I first watched iZotope’s video on Using RX Post Production Plug-ins & Pro Tools – Part 1. This taught me how to correctly route the RX plug-in onto a channel in order for it to be heard in the session.
Ambience & EQ Match in RX
I needed to replace a small section of Boom track, as handling noise was audible and could not be removed with other processes. Therefore, this guide shows how I matched the EQ and Ambience from the Boom track and processed it onto the Radio Mic track, to make this blend into the Boom and sound realistic and unnoticeable.
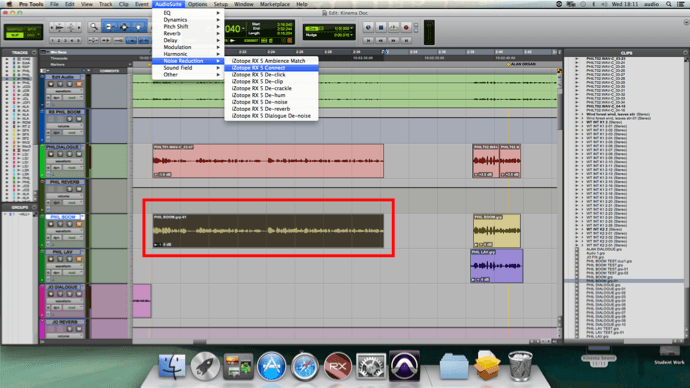
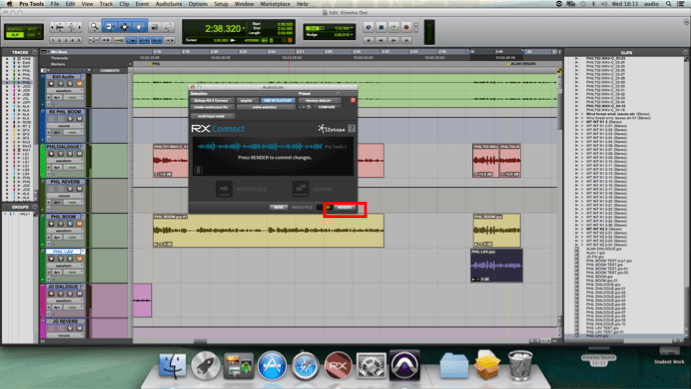
1) I selected a section of Boom track that is being used, as this is what the reference is. I then selected AudioSuite > Noise Reduction > RX Connect to bring the Connect window up.
2) I then clicked REFERENCE, as this is the Ambience and EQ which is favourable, then SEND, which send this track to the RX Audio Editor.
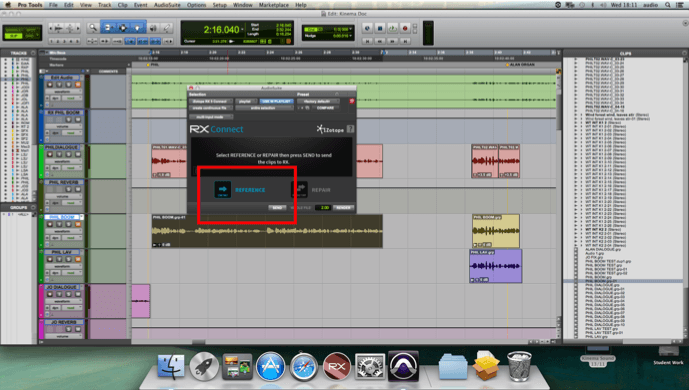
3) After this, I selected the Radio Mic track which was to be processed, then selected REPAIR and SEND, which brings up the RX Editor.

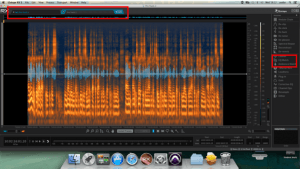
4) As you can see below there is both the Reference track and track to be repaired displayed in separate tabs. By highlighting the Reference track and selecting either Ambience or EQ Match, then LEARN, the Editor will learn the Ambience/EQ of the Reference Track.
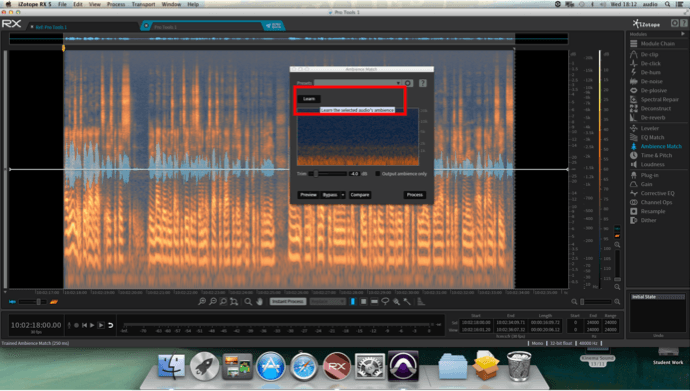
5) Then, by highlighting the track to be repaired, selecting the Ambience/EQ Match window, and clicking PROCESS, the reference will be applied to the desired track.

6) After this, I clicked SEND BACK (which sends the clip back to Pro Tools) and RENDER, which destructively alters the clip.
I found this a very useful and enlightening practice, as I had no previous experience of working with these processes. I believe they will help me greatly when working on the audio for Cognition, as there was lots of traffic noise which was captured that needs to be addressed.
Final Product
I handed Ed the complete file, but he had been working on Documentary himself and only required a dialogue mix. Therefore, I exported one of these and he uploaded the video days later. This means for the final video my work included the Location Sound and Dialogue Edit, NOT the atmos/SFX at the beginning of the clip, OR any of the music, which Ed also altered himself. I have embedded the video below for you to listen to my dialogue edit. It is not perfect, but it was the best I could do in the time that I had. I believe that I have learned many skills over these sessions using RX, and have gained confidence in my ability to repair and improve damaged clips. I will take this research into the post production of Cognition, to continue learning and improving when editing and cleaning Dialogue for both documentaries and dramas.
References
iZotope (2015) RX Post Production Suite: Using RX Post Production Plug-ins & Pro Tools – Part 1. [online] Available from https://www.youtube.com/watch?v=ulgA6NMEPZw&index=6&list=PL4dISychPQEsxHEurjxnooOEoR5I1D-O9 [Accessed 23 November 2016].
iZotope (2015) Ambience / Room Tone Matching with RX 5 Advanced Audio Editor & Pro Tools. [online] Available from https://www.youtube.com/watch?v=qK-sahpnvG8&index=8&list=PL4dISychPQEsxHEurjxnooOEoR5I1D-O9 [Accessed 23 November 2016].
iZotope (2015) How to Match Audio from Different Sound Sources. [online] Available from https://www.youtube.com/watch?v=0Um7qkHd-2w [Accessed 23 November 2016].
Published by